Friday, 29 June 2012

Back Garden Bounty

Darling hubby has made a sterling effort to turn what was once a weed-strewn and VERY overgrown area at the bottom of the garden into a fabulous fruit and vegetable plot. By the way things are coming along, it looks like we'll be enjoying the fruits of his labour (get it?!) throughout the coming months.

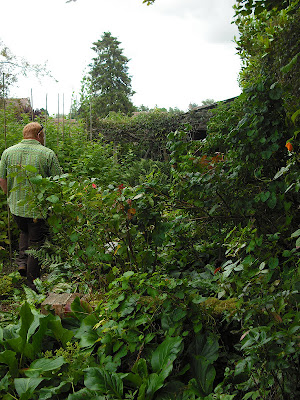
A year ago our garden looked like this - you can't even see the veggie patch(es) and you can barely make out the woodshed. Although it looks quite attractive from a distance, close up it was like a jungle down there.

See what I mean?!
And this is what the garden looked like two years ago during one of the visits we made when we'd agreed to buy the place. You can just about see the roof of  the woodshed sloping down from the right.
But, after a lot of hard work, the bottom section of the garden is starting to yield results and now it looks like this:
This is the main bed, up against the old brick wall and next to the woodshed right at the bottom of the garden. Hubby has planted rhubarb (transplanted from my Mum's old back garden), broad beans, jerusalem artichokes, carrots, beetroot, peas, sprouts, onions (red & white), radishes, squash, courgettes and probably more things that I've forgotton/missed.

Working along the bed, from right to left we have:
Rhubarb (all the way from Bristol!)
Jerusalem artichokes

Broad beans
  
Red and white onions (don't ask me which are which...)
Carrots
Peas
DC discovered a liking for these a couple of evenings ago so the three of us sat at the bottom of the garden eating them straight from the pod; even I, an ardent pea-hater, thought they were yummy. I'm surprised there are any left on the plants.
Squash and/or courgettes - it'll be a nice surprise when the fruits appear!
Brassicas - hopefully ready in time for Christmas dinner!
And a few potato plants - not sure if hubby put these in or if they just appeared as we do have a separate bed just for taters.
As seen here. Complete with chicken. There's a little gap at the front where hubby and DC and his friend Johnny dug up a couple of plants last week; the boys thought it was great fun and ever since DC has been asking 'Can we dig more potatoes?'
And, by comparison, here's what that part of the garden looked like in the summer of 2010. What was to become the potato bed was just a patch of overgrown grass.

We also have a LOT of raspberries. Two beds' worth, in fact. In the summer of 2010 they looked something like this:


And last year, the summer of 2011, they had pretty much taken over the bottom of the garden and looked like this:

At the beginning of this year hubby got ruthless and hacked them all back to ankle height; now they are looking much tidier and are a lot more manageable, although it remains to be seen whether they will bear any fruit after their traumatic haircut.

At the end of one of the raspberry beds is a pumpkin plant that DC grew from seed at nursery. Here's hoping it survives the attentions of Fizz the chook.
As well as raspberries, we also have a solitary gooseberry bush which survived in the mess that was the fruit cage. When the fruit cage was dismantled hubby made the area into the chooks' run; they're not at all interested in eating the gooseberries (and this bush is laden with fruit at the moment), so we plan to plant a few more bushes in this area. We're also intending to plant a plum tree in here to make use of the space and provide the chooks with some shade (should it actually grow...)
There's also one solitary currant bush (no idea if it's red or black); it's not doing too well as we came down one morning to find it had been totally striped of all its leaves (not by the chooks, we suspect the pigeons.) It is now growing again, but it may be too late for the fruit this year.
And, last but not least, we have the apple trees - six of them. We've had some good crops the last couple of years, but earlier this year we cut five of the trees right back as they were very overgrown (I don't think they had been tended for several years.) We don't know what effect this cutting back will have on the crops this year, but we can see fruit on most of the branches on four of the trees.

This is the espalier tree in front of the potato bed.
And these are the other trees, in front of the chook run.


Things are looking good for pies and crumbles this year!


Thursday, 28 June 2012

Garden Renovation. One Year On. 28.06.12

There seem to be a dearth of photos from the house renovation this time last year; I don't know why - perhaps we were getting bored of it by then?! Or we may have been away. However, I did find this little beauty while trawling through the hundreds of badly organised photo files on my pooter:

Taken on Tuesday 28th of June 2011. Hubby was up the scaffolding admiring the new roof on the two-storey extension when he had the foresight to snap this shot too.
Compare and contrast to the shot I've just taken this evening, Thursday 29th of June 2012. This was taken from our bedroom window so the angle isn't quite the same, but it's not far off.
Would you believe from the first photo that there was a lovely old gate in the back wall? Or that we had a fence to the right side of the garden? Or that there was a gravel path on the right as well? Hubby (with some help from my Mum and a little help from me) has done such a good job of clearing, cutting back, weeding, tidying, replacing the rotten fence, re-gravelling the paths, planting veggies for us to enjoy over the coming months, and generally making the garden a much more pleasant place to be. Well done hubby!

Sunday, 24 June 2012

H.O.M.E spells...

Quite a long time ago I bought some 3D letters (H, O, M & E - can you guess what I was looking to spell?!) from the weekly market in Henley-on-Thames. I had big plans to hang them on a wall somewhere on our old house (yes, that's how long ago it was that I bought them - we sold that house in April 2011...) They languished in a drawer in the dresser in the kitchen for a while, then they got packed up and moved to our rental house in our new village where they sat in a drawer in the dresser in the spare bedroom (I think), then they got moved to our new house back in October last year where they sat in a drawer in the dresser in the living room. Until finally, a few weeks ago, I got them out and propped them on the table in the hallway. However, because they were white, they didn't show up very well against our wall since all the walls in the entire house are painted white; so I hatched a plan to paint the letters a different colour so that they would stand out if/when we got round to hanging them up, or even if they just stayed propped up on the hall table. For some reason, this photo refuses to be righted, so you'll just have to enjoy the upside down HOME experience.

 And in homage to that bloke from Steps...

Obviously, buying paint took several more weeks since I never seemed to be anywhere near a DIY store (or anywhere else that sold paint), but finally on Wednesday just gone I managed to pop into B&Q; I had high hopes of picking up a lovely shade of green from the Farrow & Ball range, but I was thwarted since B&Q had none in stock.

Determined not to leave empty handed, I went for Morris Blue from the 1829 range by Craig Rose; I've managed not to take a photo of the paint in its sweet little tester pot. Apologies. But you can see the entire range here, should you be so inclined.

On Saturday morning I set to with my letters, my tester pot and a paint brush, while hubby entertained DC. Here are the letters after one coat of paint. I ended up doing three coats over the course of the day, and managed not to take any more photos. Boo hiss to me.
By Saturday evening, I was ready to start hanging them in the allotted place. I was slightly tempted to go with the Zen approach with a little OM(mmmmm).

But good sense prevailed. Finally, HOME is no longer cluttering up the dresser drawer.

And while the hammer and nails were out in the hallway, hubby set to with a drill and hung the new blind I'd scored for a bargain at the John Lewis in High Wycombe on Wednesday. Here's hubby taking the technical approach to blind hanging.
 
Here's a before shot of the window, sans window dressing.
And here it is after hubby worked his magic. Apologies for appalling lighting in these shots. And the 'Home' sign hanging on the window is coming down, now that we have big HOME above the door (I think two signs is one too many.)
I was rather pleased to have got this blind since it was in the 'bargain basement' section of JL's curtains and blinds department - the section where they sell off at massively reduced prices window dressings (ie all manner of curtains, roman blinds, venetian blinds, roller blinds) that have been made to measure but for some reason not sold to the person for whose windows they were especially made. It takes a lot of luck and patience to get a blind (or set of curtains) in the exact measurement you need and in a fabric that you are happy with. I've been on a mission every time I've been to a JL for the past few months to see if I could find something suitable (and bargain-tastic) for any of the five windows in our house that remain 'naked'. And this time I struck paydirt. And thus, for the grand total of £40, we have this charming little number.
Makes this little corner of the house feel much warmer, more homely and a lot more 'finished.'